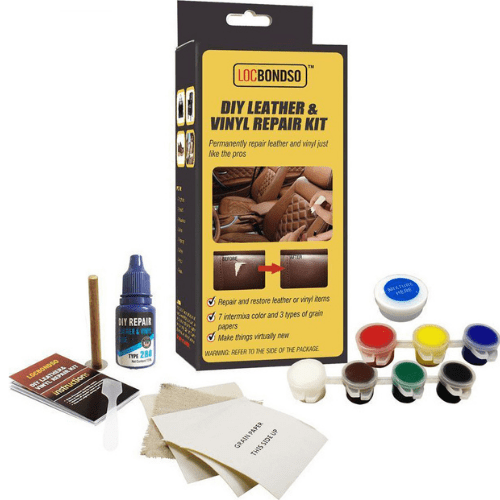
DIY Automotive Car Seat Leather Vinyl Repair Kit Locbondso XF06
6,99 €
In stock
DIY Automotive Car Seat Leather Vinyl Repair Kit Locbondso XF-06
Description:
Repairs holes and damage to leather, leatherette, or fabric and can eliminate almost any scratches. It is a must for leather cars and home seats since the annoying holes that you accidentally created will have disappeared very quickly.
Special repair fabrics are included and different colors for mixing each color to suit many types of leather and colors. Using the kit is relatively simple and easy.
All you have to do is cut the fabric to the size you need to cover the hole you want. Then pass it under the surface you want to fix and then paint it on top with the special paint you prepared.
A unique way to not have to change the upholstery in the car or throw away your favorite jacket because of a small hole.
Instructions for use:
Practice on a piece of vinyl before proceeding with the actual repair.
Read the instructions before using this KIT.
Clean and dry the repair surface with household detergents. Cut the threads with a razor or knife.
Cut a piece of fabric slightly larger than the hole and use the spatula to drill it under the surface to be repaired. Note: If the hole is less than ¼ an inch you do not need to use the fabric.
The KIT contains various sheets. After the repair has dried, you have chosen what looks like the vinyl of your car. Draw the shape of the damage on the outside of the sheet (This side up). This will help you to place the hot iron accurately.
Using a spatula, glue the hole to the height of the surface. Allow the glue to dry for 4 hours. When completely dry it will wrinkle very tightly leaving a gap which you have to fill with the paint mixture.
If 1 of the 7 colors matches the color of the vinyl you are going to repair, use it directly. If not, mix the colors until you get the color that matches the vinyl you are going to repair.
Using the spatula, apply the paint mixture to the repair site. Apply a thin layer of the mixture around the damage. Sand the edges to make the surface isometric. Proper application of the mixture requires great care. Wipe off the excess around the damage. DO NOT OVERCOME THE DAMAGE WITH THE MIXTURE. Add less mixture but no more. Glue the sheet over the liquid mixture. Make sure the shape you draw on the outside of the sheet is just above the damage.
Use the iron of the house or the heat transfer tool or the car lighter. With the iron on the highest temperature range and let it warm up for 3 minutes (the heat transfer tool needs the same time to warm up). Immediately place the tip of the hot iron plate or tool or lighter on the sheet drawing. Do not allow the hot metal to touch the vinyl. Rotate for 35-45 seconds or until the hot metal has cooled on the sheet. Do not remove the sheet. If the damage is severe you must repeat the same procedure with the iron or the tool or the lighter. The heat must reach all parts of the body and all around it. Remove the sheet. If the damaged area is still wet or stuck you must repeat step seven.
In case you are not sure that you can do the job, contact a professional. Follow the instructions correctly. Always wear eye and hand protection, as glues and paints can cause damage.


Package Includes:
7x 3ml Color Paint
1x 15g Sealer Glue
1x Heat Transfer Tool
1x Practise Leather
3x Grain Paper
1x Backing Fabric
1x Plastic Spatula
1x Mixing Cup
1x Instruction Manual
| Weight | 111 g |
|---|---|
| Dimensions | 20 × 9 × 6 cm |
Brand
LOCBONDSO
You must be logged in to post a review.
Q & A
Ask a question
Your question will be answered by a store representative or other customers.
Thank you for the question!
Your question has been received and will be answered soon. Please do not submit the same question again.
Error
An error occurred when saving your question. Please report it to the website administrator. Additional information:
Add an answer
Thank you for the answer!
Your answer has been received and will be published soon. Please do not submit the same answer again.
Error
An error occurred when saving your answer. Please report it to the website administrator. Additional information:

 Ελληνικά








Reviews
There are no reviews yet